

Positioning the Motifs
 I plan to work 3 stand alone motifs on this strip. So, I folded the fabric along with the net in half both lengthwise and width wise and marked the center. Alternately, you can either measure it out or if you have the time and patience count out the number of squares in the net. I should have worked the center motif first. But the thought somehow did not occur to me.
To mark the position of my first motif, I folded the part of the fabric to the left of the center such that the seam line aligned with the center. The starting point 'S' is 3 stitches lengths away from the center. I've marked the center with an X in the graph above. The 3 black horizontal lines from X to S indicate 3 stitch spaces.
Net Vs Graph
 The adjacent image should clarify any doubts you may have about the relationship between the vertical, horizontal and diagonal lines on the graph versus the net.
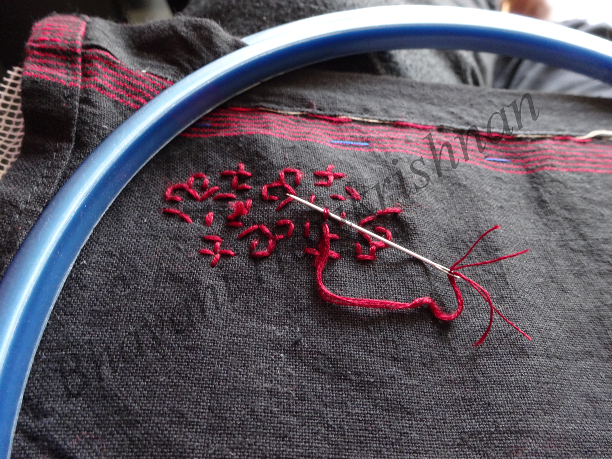
Making The Knot
 Kasuti is supposedly a style that is worked without knots. Remember the embroidery is reversible and for the embroidery to be truly reversible, the work should look very neat on both sides. But I prefer to use knots. I wouldn't want the embroidery to unravel. So, here's how I've worked my knot. It neatly secures the beginning yarn. Here are the steps
Step 1: Pick up about 2 threads of fabric (in the direction B to A) with your needle and pull it through leaving just about 1/2cm of yarn (tail yarn). Hold the tail yarn down firmly with your left thumb. Take the needle around to B again as indicated by the pink arrow and pull the yarn through the same space. The other steps are clear enough. Hold the 1/2 cm tail down firmly or it will slip through and you'll have to repeat the process. You can click on the image for a slightly enlarged version.
Kasuti Embroidery on Net Grid
Now that we got the basics out of the way, use the images below to guide you through working the motif on net.


I've completed all the side trips in the first half of the onward journey and reached the center of the motif.

I've completed the onward journey including all the side-trips and I've run out of yarn. The image below shows how to weave the yarn into the pattern on the reverse.
Here's the completed motif

Use the method above for working running motifs (motifs are arranged to form a continuous running pattern) Complete the onward along with the side trips till the end and then work the return trip.
 For stand alone motifs, it is easier to start at the center and treat each arm of the pattern as separate journeys complete with side trips. That's how I worked the motif the 2nd time. Check out the image on the left.
I've started at the center, completed the left side of the pattern and returned to the center.

In the picture on the left, the right onward journey. When I complete the return journey, I'll get back to the center where I started.
Removing Net

If you closely observe the warp and weft yarn of the net, you'll see that the warp has 2 strands of twisted yarn and while the weft a single strand. It's therefore easier to remove the weft yarn. So that's what we'll do.

Removing the net is easy enough where there's no pattern to hinder it.


Once all the weft thread covered by the motif is removed, a gentle tug is all it takes to completely remove the net.

4 comments:
What is this net called and where can we get it ?
Hi.
Can I know what kind of net material you're using as a guide
? What is the name and where can I find it?
Where I get this net
Wonderful😍, explained very well
and the appropriate pics. Thank you. I just wanted to check any reference on buying net fabric?
Post a Comment